01 · Getting started
First runBomberParty is two modes on one start screen. Classic is grid bomberman: co-op for 1–4 players, 40 levels, bosses, and a head-to-head mode. The Landing is an online open world: you drop onto a planet for loot, shoot, plant bombs, level up, run dungeons and return to the ship.
Installing
- The game installs through Steam — the BomberParty store page. Launch it from your library.
- Your name and language come from your Steam profile on first launch.
- F1 opens the built-in help. In the Landing that is six pages of numbers: abilities, stats, gear, bombs and the price of death.
02 · Controls
Remappable in settingsShared and Classic
| Action | Keyboard | Gamepad |
|---|---|---|
| Move | WASDor↑←↓→ | Left stick, D-pad |
| Bomb | SpaceorEnter | A |
| Detonator (Classic) | E | B |
| Throw bomb (Classic) | Q | X |
| Emote wheel (Classic) | Z hold | Y hold, right stick to pick |
| Voice (push-to-talk) | V hold | — |
| In-game help | F1 | — |
| Menu | Esc | Start |
| Full screen | AltEnter | — |
The Landing
| Action | Keyboard & mouse |
|---|---|
| Fire | LMB — the shot goes where the reticle is, not where you are facing |
| Target lock | RMB on a target — the crosshair tracks it by itself; RMB again releases, T cycles targets |
| Run | Shift — costs stamina |
| Reload | R |
| Bomb · bomb type | Space — plant; Z / X and mouse wheel — cycle the type |
| Detonator · throw | E — set off detonator charges; Q — throw the bomb with the glove |
| Guns | 12 — two weapon slots |
| Field kit | 3 — stimulant, 4 — repair kit |
| Abilities | 567 — the three chosen abilities |
| Interact | F — take an item, a counter, a talk or a descent into a dungeon |
| Bag | Tab |
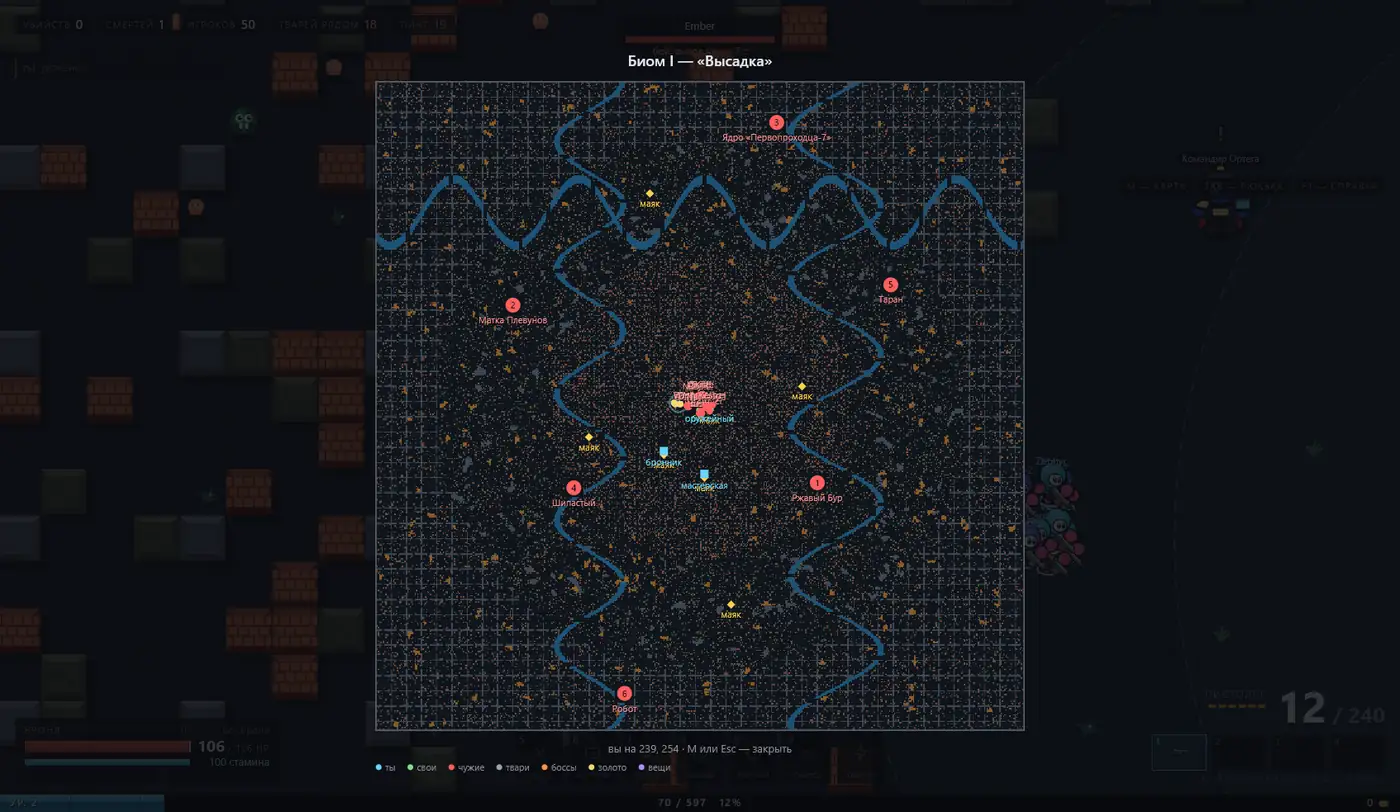
| Windows | C — stats, L — quest log, M — biome map, J — planet journal |
| Chat | Enter — write to everyone in the world |
| Party | P — invite to the party, K — leave it |
Gamepad
Controllers are read through the standard gamepad interface, so a Steam-recognised pad (Xbox or PlayStation) works without configuring anything. In Classic: A — bomb, B — detonator, X — throw, Y — emote wheel. In Landing combat the layout is twin-stick: left stick — move, right stick — aim, R2 — fire, L2 — run, A — bomb, B — detonator, X — pick up, Y — reload, D-pad — bomb type, bag and stats, LB/RB — pick an ability, L3 — use it, R3 — target lock, Back — map. Stick dead zone is adjustable in Settings → Controls.
03 · Classic
Co-op 1–4 · 40 levels · bossesClassic is a bomberman arena: clear out the mobs and find the exit under a brick. There are 40 levels, with bosses at 10, 20 and 30. Play alone (“Play solo” runs the server locally), with friends by room code, or through “Quick join”. Inside a room you pick the mode: Classic or Head to head.
Bonuses from bricks
Radius
The blast reaches one tile further along every arm.
Speed
Your character moves faster.
Plus bomb
One more bomb you can have on the ground at once.
Freeze
Every mob on the level stops for a few seconds.
Kick
Walk into your own bomb and it rolls until it hits something.
Glove
Unlocks the bomb throw over walls — key Q.
Detonator
Bombs stop exploding on their own; you set them off with E.
Vest
For about 20 seconds you pass through bricks and bombs.
Question mark
A random effect: super speed, invulnerability, inverted controls, god mode, or the necromancer — it raises fallen teammates with a blast.
Skins
Nine skins, all unlocked by playing. There are no purchases in the game.
| Skin | Unlocked by |
|---|---|
| Blue, Red | Available from the start |
| Green | Clear one level |
| Yellow | Reach level 5 |
| Cyan | Score 5 000 in a single session |
| Shadow | Reach level 10 |
| Frost | Win a head-to-head match |
| Spark | Score 10 000 in a single session |
| Volt | Reach level 20 |
Leaderboards
Three boards: Team, Solo and Landing. The first two count Classic scores (a solo session record goes to the same table), the third shows your Landing character level and time played.
04 · Open world — the Landing
What it is and how it worksThe Landing is a world shared by everyone: you go down for loot and come back up to the ship. Experience, stats, items and money stay forever — they are the progress. Classic bonuses (radius, +bomb, kick and the rest) last only until you die: you collect them again every time.
Worlds and biomes
- Before you drop, you pick a world — the official “Sunrise” servers in different cities. The screen shows each world's ping and how full it is. Rates are identical everywhere and progress is shared: only latency and the people around you differ.
- The first biome is The alien planet: a warm hive world for levels 1–40, with spitters, berserkers and swarms. The icy planet and the Death star stand locked on the selection screen — they unlock by level.
- The corners of the map are home to visitors — the Yeti and the Dark Lord. Both are far stronger than the regular fauna of the biome.
Ship and base
- The lift to the ship is in the Esc menu; it is not instant and is broken by damage — there is no leaving mid-fight. The evac beacon lifts you at once, but also not in combat.
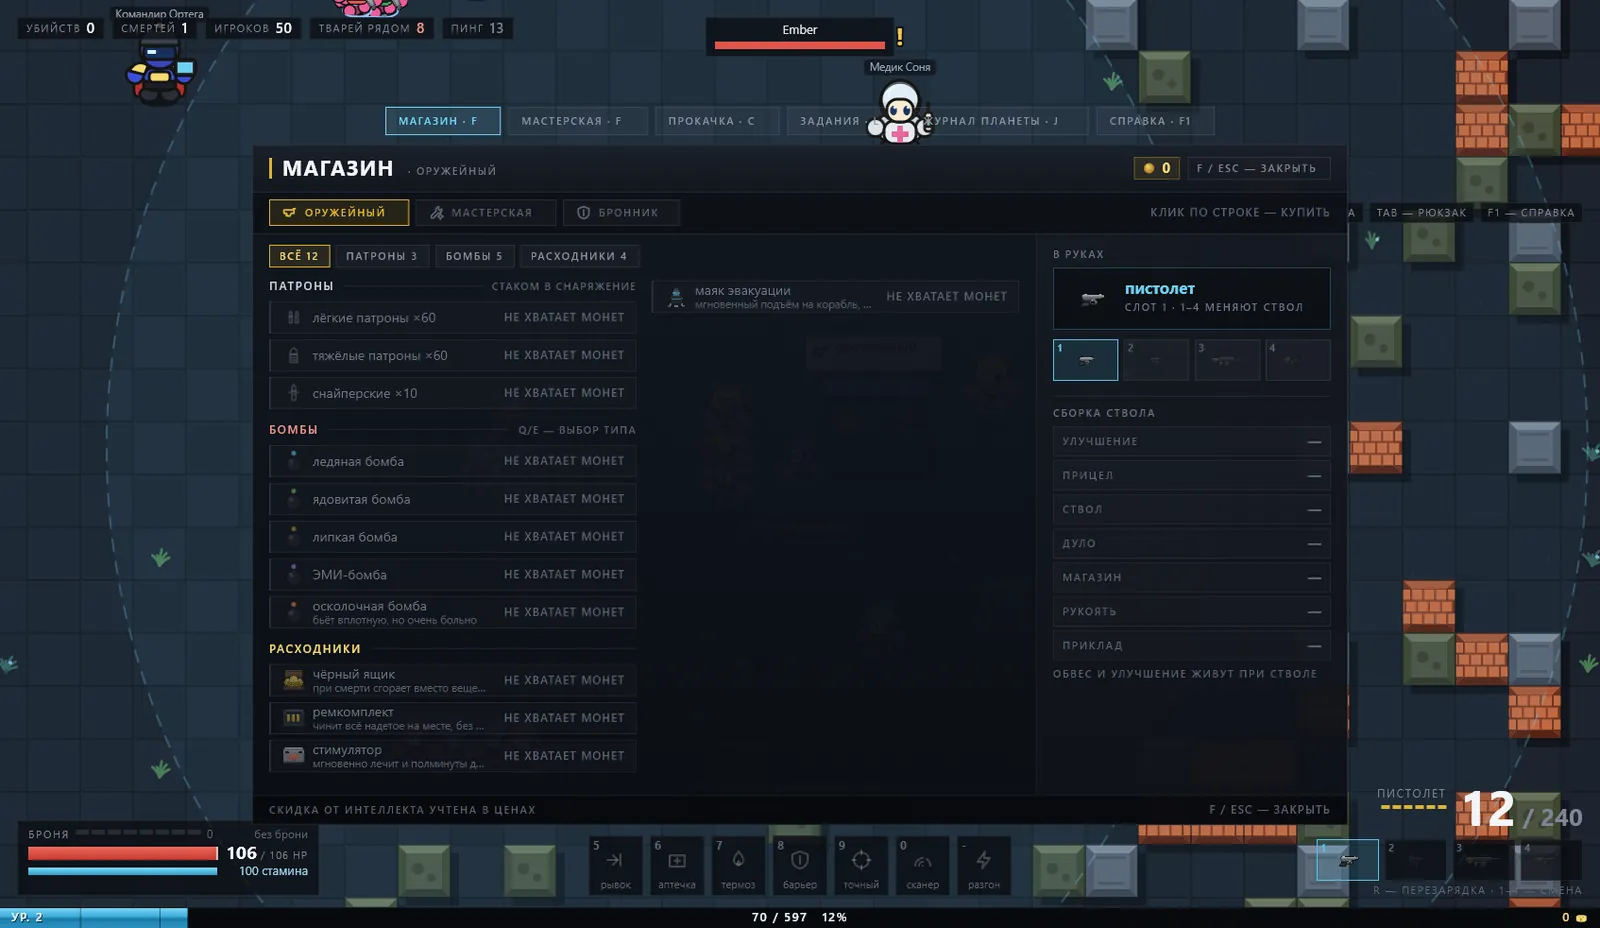
- The base has three counters: the armoury, the workshop and the armourer. Selling works everywhere: spare loot goes to any of the three.
The price of death
| What you lose | How |
|---|---|
| Always | A tenth of the current level's experience (the level itself stays), 20 durability off everything equipped, all Classic bonuses |
| The gun in your hands | 60 % chance (the pistol never drops); its build can be bought back |
| A third of your wallet | 35 % chance |
| An item from the bag | One random item, 25 % chance. Equipped gear never drops |
05 · Reading the screen
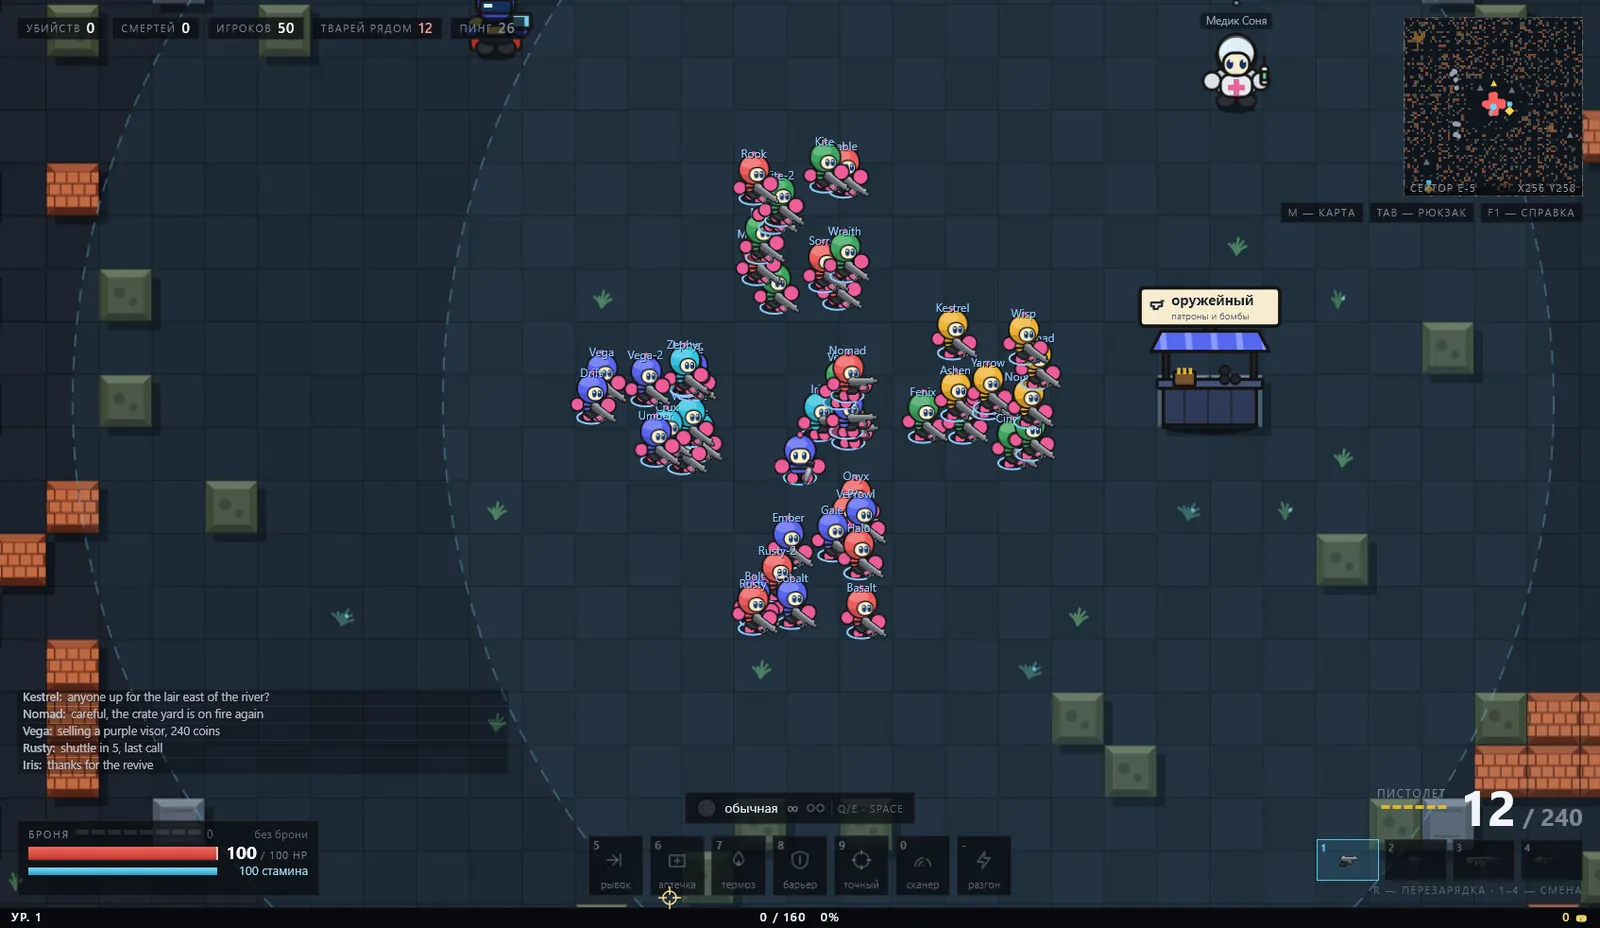
Landing HUDThe Landing's whole interface sits in the four corners of the screen; the middle stays free for the game.
Bottom left — your condition
- Armour is the sum of what you wear. It soaks damage before health and wears out; with no armour the damage lands in full.
- Health grows with your level and Endurance. Rest restores it out of combat; the Medkit ability or a stimulant restores it inside one.
- Stamina is spent on running and movement abilities. While it is empty, the dash is unavailable.
- Experience runs along a bar with your current level next to it.
Top left — the session
- Kills and deaths for this session.
- Players — how many people are in the world with you.
- Beasts nearby — how many hostiles are within the radius around you.
- Ping — your round-trip to the server. Above roughly 150 ms the controls start to lag.
Top right — where you are
The minimap shows the sector around you, with its designation and your coordinates in its footer. Press M for the full biome map. NPCs show up on the minimap as dots.
Bottom right — your weapon
The current gun, ammunition in the magazine and in reserve, and the two weapon slots (1 and 2). An empty magazine clicks instead of firing — R reloads.
Bottom centre — bomb and abilities
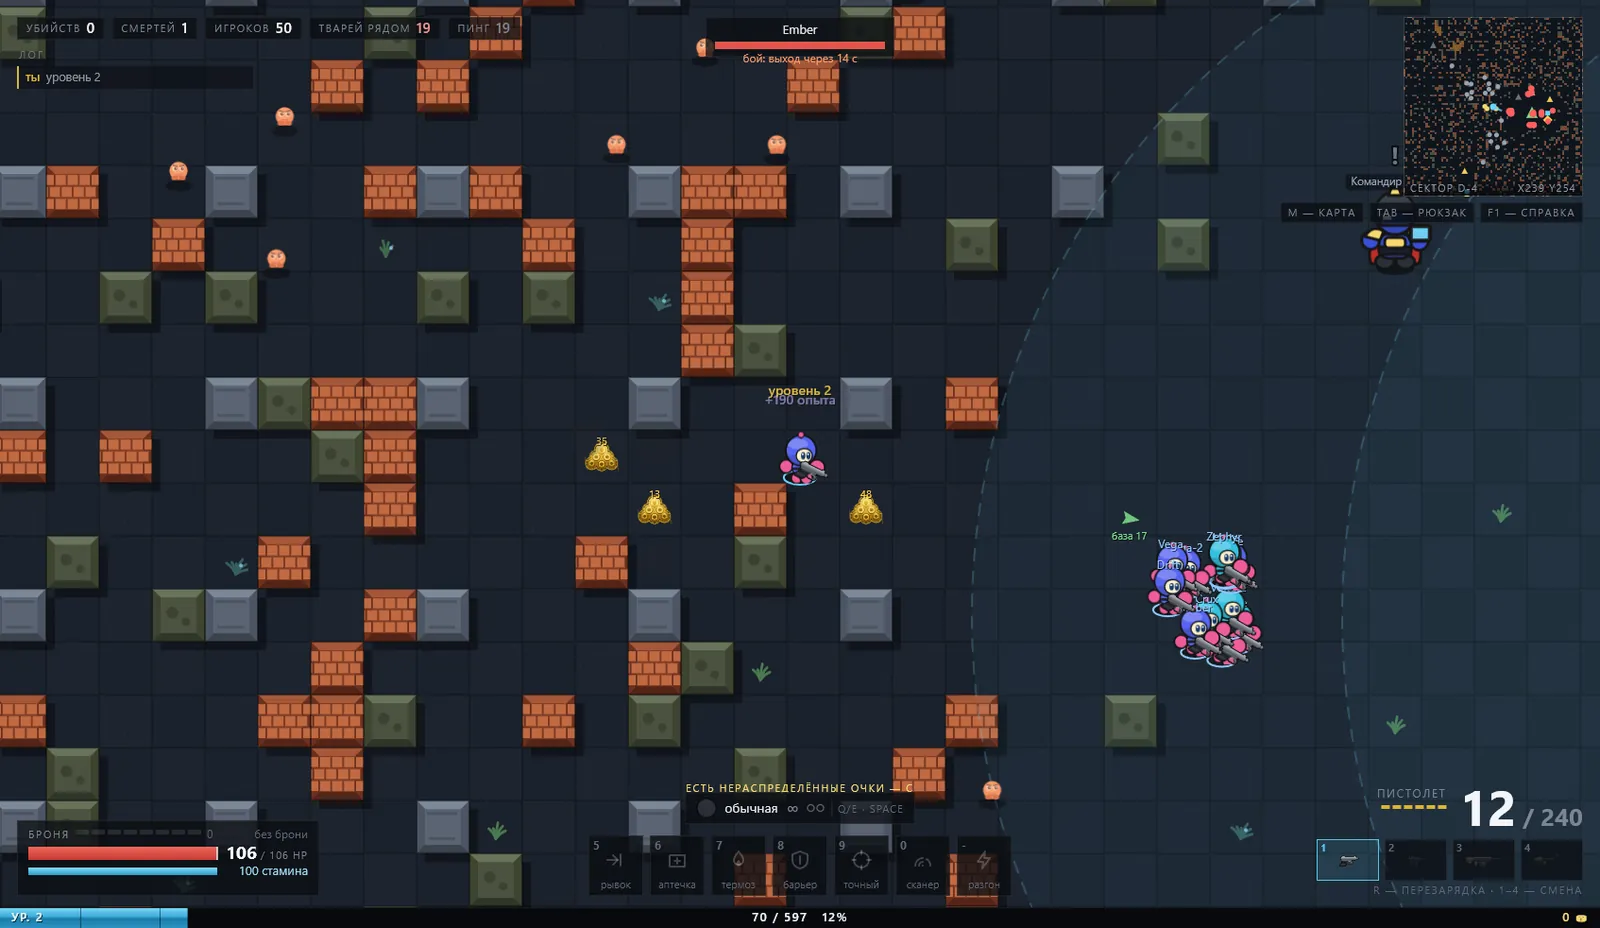
The bomb type you are holding (the dots under the slot show how many charges are already planted), then your three chosen abilities. A dark slot is on cooldown. When you have unspent points, the game says so directly above the bar.
Windows
The shop, workshop, stats, quests, planet journal and help share one window with a row of tabs on top: shop · F, workshop · F, stats · C, quests · L, planet journal · J, help · F1. You switch between them without closing the window.
06 · Combat
Bombs, guns, hazardsBombs
- Plant with Space. While a bomb ticks, its blast zone is highlighted on the floor. The blast travels along the grid in rays and stops at solid blocks: a corner gives cover, an open lane does not. Right next to the burst the damage reaches diagonals too.
- The ordinary bomb is endless; the rest are finite and bought from the gunsmith: the ice bomb freezes, the poison bomb poisons, the sticky bomb slows, the EMP bomb jams, the frag bomb hits point-blank but very hard. Cycle the type with Z/X or the mouse wheel.
- Up to three of your bombs on the map at once; the “+bomb” bonus raises the cap.
- The detonator (E) sets your charges off when you decide; a forgotten bomb goes off by itself after 20 seconds. The glove (Q) throws the bomb from under your feet three cells over a wall.
- The Holy bomb is a charge: your next ordinary bomb hits 12 cells and burns through the whole row without stopping at a destructible block.
- Your own blast deals you full damage, same as any other.
Guns
- There are seven guns: the pistol, the submachine gun, the machine gun, the sniper rifle, the deagle, the AK-47 and the M4A1. You carry two — slots 1 and 2.
- Six of the seven are not sold anywhere — you loot them. The service pistol is sold at the armoury and never drops on death.
- Ammunition comes in three kinds — light, heavy and sniper — one per gun class. A pack on the ground is picked up by anyone with F.
- You aim towards the cursor. RMB on a target — lock: the crosshair moves onto it and tracks by itself while it lives. The cursor changes shape: red — a beast, orange — a stranger, green — a friend.
- Spread grows with running and recoil; you group tighter from a standstill. Reloading takes time: R mid-fight leaves you without shots for a couple of seconds.
Hazards and terrain
- Water, acid and lava can be waded: your speed drops to 15 %, you sink up to your head, and acid and lava deal damage every second you are in them.
- Ice is slippery: it carries you a few extra cells after you release the key.
- Snow lies along the map's edge: drifts slow you down, a blast scours a crater in the snow, and snowfall drifts over it.
- Wooden crates stand in depots all over the biome. A crate breaks from one hit, fire remains in its place, and it spreads to neighbouring crates. A burning cell burns everyone standing in it, fauna included.
- Shell shock: a close blast smears the screen with a jolt from the burst point. It lasts up to several seconds, depending on distance and damage taken.
- Dungeons are dark: torches give light, and the Scanner is the only way to see a beast before it closes in.
07 · Abilities & stats
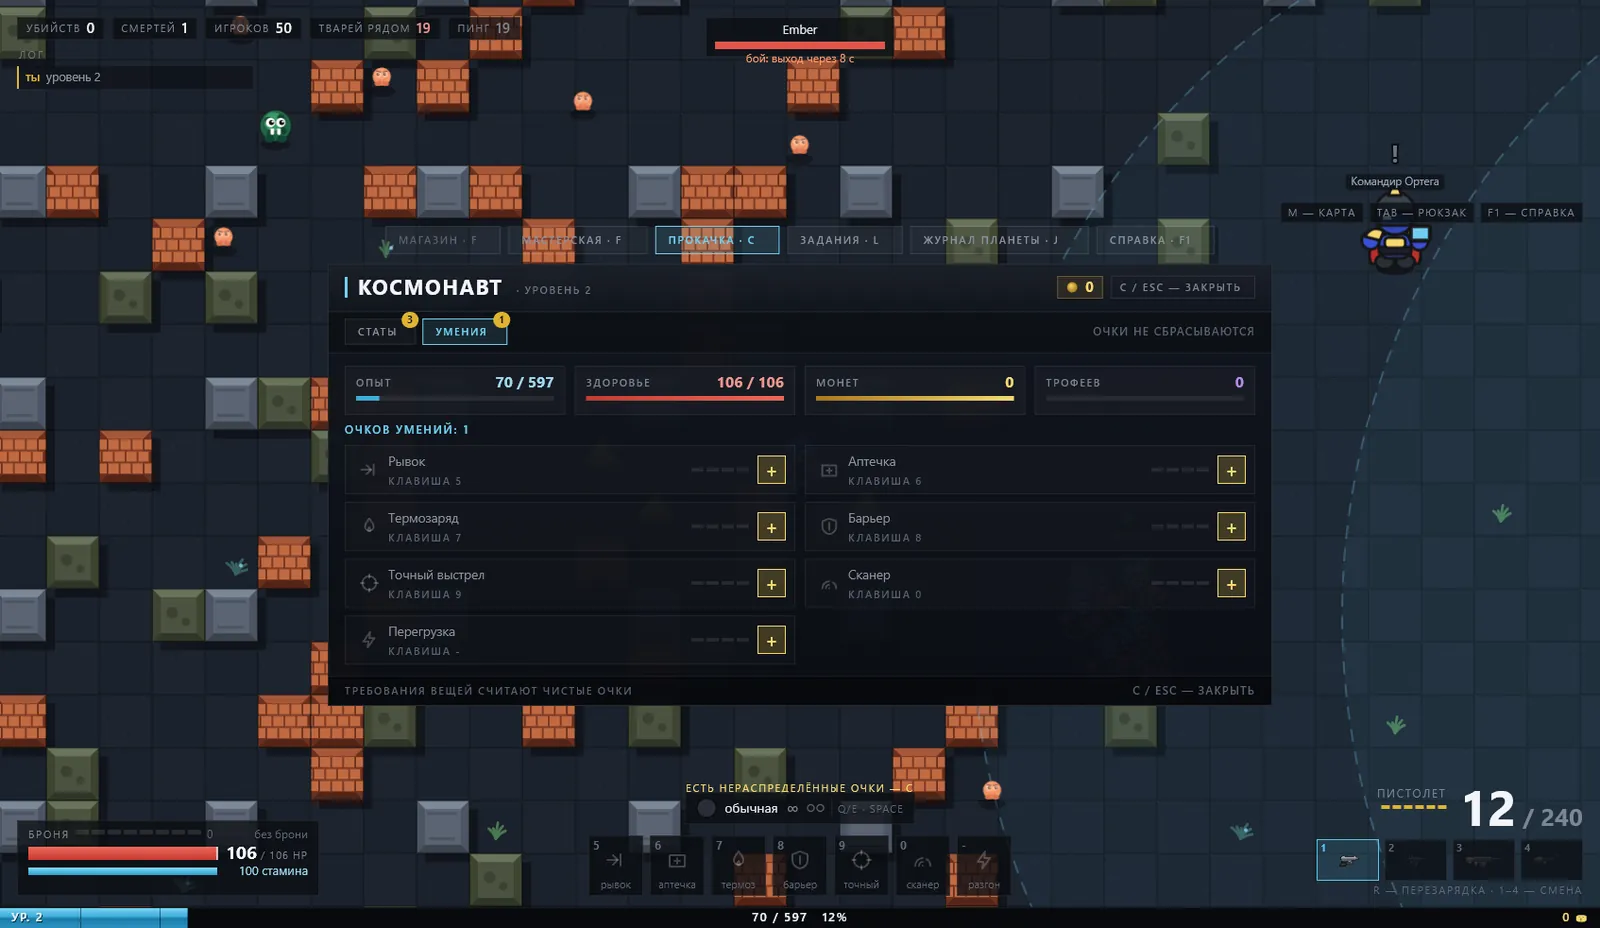
Keys 5 · 6 · 7 and CThere are nine abilities and three slots: the first point you invest claims a slot for good. The chosen abilities sit on 5, 6 and 7 — in the order you picked them. Instructor Scar at the base resets them: he gives the points back and frees all three slots for coins. Abilities cost stamina and go on cooldown; they use no ammunition.
Dash · Рывок
A burst towards the reticle with invulnerability frames on the way. Costs stamina.
Medkit · Аптечка
Heals over several seconds and works in combat — that is what separates it from resting.
Thermal charge · Термозаряд
For six seconds every bomb you plant is bigger and hits harder — the whole series, not just one.
Barrier · Барьер
Takes damage instead of your health until it burns through.
Precise shot · Точный выстрел
For six seconds you shoot with no spread and a damage multiple — on every shot.
Scanner · Сканер
Highlights fauna through walls and shows it on the minimap farther than the eye can see. In dungeons it is the only way to spot a beast before it reaches you.
Overload · Перегрузка
Tears down the portals around you outright and hits the rest of the fauna nearby.
Healing aura · Лечебная аура
A circle around you: heals your party and raises their endurance, strength and intellect.
Lightning · Молния
Hold the key: shocks everything alive nearby, other players included. Costs stamina.
Stats — per point
| Stat | Per point |
|---|---|
| Endurance | +8 health, +3 stamina, +0.4 HP/s out of combat, −0.6 % blast damage taken. Medium armour requirements read it. |
| Strength | +2 % gun damage, +3 % bomb damage, −2 % recoil sway; every 6 points — +1 cell of blast radius (cap 12). Heavy armour requirements read it. |
| Agility | −0.8 % time between shots, −1 % reload time, −1 % spread, +0.15 % run speed. Light armour requirements read it. |
| Intellect | +0.8 % experience, +0.5 % loot chance, +1.5 % duration of special bomb effects (ice, poison, EMP), −0.5 % shop prices (down to half). |
- Three stat points per level; over 25–35 hours of play that is roughly a hundred points.
- Stat points are not refundable. Only abilities can be reset, at Scar's on the base.
- Item requirements read your base points, without equipment bonuses: one item cannot help you meet another item's requirement.
08 · Gear
Tiers, cells, modulesTiers and stars
- Five tiers: common · unique · world · legendary · experiment; properties per tier — 1, 1, 2, 3 and 4. A tier's colour is the same everywhere: on the ground, in the label and in the cell frame.
- Legendary and “experiment” drop only from bosses — out in the world you will never find anything above “world”, however many beasts you clear.
- Stars mark an item's rarity, from one to three; three-star items turn up far more rarely. Each star adds its own property and raises the item's stats, but a three-star item always carries a red property — minus to health or to speed. Stars never change the armour value itself.
Armour classes
| Class | Asks for | What it gives |
|---|---|---|
| Light | Agility | 70 % of medium's armour, +2 % speed and +4 % stamina per item. |
| Medium | Endurance | Nominal armour, +1 % speed and +2 % stamina per item. It is what the armourer sells. |
| Heavy | Strength | One and a half times medium's armour, −2 % speed per item. |
Requirements by tier are 0 / 7 / 15 / 33 / 42 points of the class stat. Collecting a set in one class pays off: every item of a class reads the same stat. Short of it — you can see the item but not wear it: in the bag it shows a cross.
Durability and repair
Equipped gear wears from damage taken; death takes 20 off at once. The armourer at the base repairs it (including what lies in the bag), or a repair kit does it right in the field (key 4).
Energy cells and fractals
- About half of all items have a socket for an energy cell; the item's description says whether it has one.
- A cell is fused into an item for good. Five tiers, three families: an armour cell — percentages to the item's armour (T1 +8 % … T5 +40 %), a field cell — a property only, a composite — both, but each weaker.
- The base workshop fuses up to T3; T4 and T5 only at a dungeon smeltery. The work is paid; a fused cell can be pulled at either master, but at twice the fusing price. A second cell replaces the first.
- Cells are not sold anywhere: you loot them from fauna, take them from dungeon chests and earn them as quest rewards. A boss always drops one. Fused gear glows — the higher the cell's tier, the brighter.
- Fractals are obtained by breaking down cells at the smeltery. They sharpen items at the workbench: each step gives +5 % armour and properties, the cap is +6, the price is the item's tier in fractals. Sharpening fails 30 % of the time: the item returns to its base form.
Guns as items
- A gun is an ordinary item: it lies in the bag and is dragged into slot 1 or 2 and back. You can own any number of identical guns — each with its own upgrade and its own attachments.
- A gun has six sockets for modules: scope, barrel, muzzle, magazine, grip, stock. Modules drop from fauna and bosses and are fitted at the workshop; T4–T5 come only from lairs. Death takes the gun but not the modules on it — the build can be bought back.
- Spare guns are handed to storage at the gunsmith: they wait there without taking up the bag. Storage holds 24 guns.
- The deagle and the SMG turn up near the base, the M4 in the middle zones, the AK in the far ones; the sniper rifle and the machine gun come from more serious lairs. A boss always drops a gun, sometimes two at once.
09 · World, quests, dungeons
Keys M · L · J · FThe planet is divided into sectors, each with its own designation and its own population of beasts. The further from the base, the stronger the fauna and the better the loot.
Quests and NPCs
- Twenty people stand across the biome. An exclamation mark overhead means there is work to give; a question mark means you can turn one in; a grey icon means “too early”.
- F — talk, L — the log: the goal, what remains, and the coordinates of whoever you go to next. NPCs show on the minimap as dots; the big map does not mark them.
- Quests come in memory kinds (go ask and come back with the answer) and logic kinds — there a mistake fails the quest, but it can be taken again. Errands repeat every few hours.
- Letters and samples sit in the bag and can be lost on death: a lost letter is a failed quest. No more than eight quests run at once.
Dungeons
- Five entrances are scattered across the biome; each states the level it admits from. Walk up and press F — and you are inside.
- A copy of the dungeon is created for your party: the chests are untouched, the boss is alive, nobody else is inside. You cannot return to the same copy; the next descent creates a new one.
- Below: darkness, traps, doors with levers and keys, its own bosses and the smeltery — the only place that fuses higher-tier cells and breaks cells into fractals.
- A full clear pays out a thousand-plus coins, two or three top-tier items, a gun and consumables for the whole party.
- The way back is Esc and “return to the surface”. Death also throws you up, and the copy closes with it.
Loot
Drops stay on the ground for 45 seconds, then disappear. Classic bonuses are picked up by stepping on them; if you are already at the cap for that bonus, it stays where it lies and goes to someone else.
11 · Settings
Key EscThe gear on the main screen, or Esc in a session, which offers Resume · Settings · Leave to menu · Quit game.
| Tab | What is in it |
|---|---|
| Display | Fullscreen or windowed, window size, effects (bloom) |
| Audio | Music, sound effects, all sound, voice volume |
| Voice | Microphone, mode (voice activity / push-to-talk / off), gain, activation threshold, your own marker, who you hear, microphone test |
| Controls | Key remapping, controller and stick dead zone, touch controls |
| Game | Explosions and fire (classic / shader / shader bright), light and shadows, Landing scene (GPU / classic), pixelated view, party status, game language |
Language
The game is translated into Russian, English and Chinese. Translations live in the lang folder next to the game — edit or extend them without rebuilding; anything untranslated stays in Russian.
Graphics
The accelerated Landing scene draws the world through the GPU — faster and with effects; the classic path is the old one, for weak machines. The pixelated view draws the world in large 3×3 pixels (needs the accelerated scene), and light and shadows turn on in dungeons where the map author set the darkness.
Full screen and window
The game starts full screen. Switch with Alt+Enter or on the Display tab in settings. In windowed mode you resize with the mouse; the chosen mode and size are remembered and restored on the next launch.
12 · Saves and achievements
Where things are stored- Classic progress — unlocked skins, your score record and all settings — is stored on your own computer. It does not travel between machines: on another computer Classic starts from scratch.
- Your Landing character lives on the server, tied to your Steam account: the official worlds share one progress — wherever you drop, it is the same hero.
- Your best score is submitted to the leaderboard and only ever moves upwards.
Steam achievements
- Classic: the first cleared level, levels 5, 10, 20, 30 and 40, a head-to-head win, and 10 000 points in a session — the same milestones as the skins.
- Landing: the first landing, the first boss, character levels 10–40, a tier-3 attachment, a thousand coins in hand, killing a player, blowing up a party mate with your own bomb, and 100 and 500 destroyed blocks.
13 · Troubleshooting
Known casesThe Steam overlay does not open
The overlay on Shift+Tab attaches to the process that draws the picture. The game launches in the mode where that works, but if the overlay still does not appear, add a launch option in the game's properties in Steam:
| Launch option | Effect |
|---|---|
| --overlay=inproc | Default. Rendering in the main process; the overlay attaches. |
| --overlay=noaccel | Fully software rendering. The overlay attaches almost always, at the cost of hardware acceleration. |
| --overlay=off | No overlay at all. |
A world in the list shows a question mark
A question mark means the world did not answer the probe: it is overloaded, down, or unreachable from your network. The list re-checks itself every few seconds — if the mark stays, pick another world: progress is shared and the character is the same.
The microphone list shows "Microphone 1 / 2"
Device names are only revealed after you have granted microphone access once. Allow it, then reopen the list and the real names appear. If a device disappears — a headset unplugged — capture falls back to the system default on its own.
Nobody can hear me
- Check the mode in Settings → Voice: in push-to-talk nothing goes out unless V is held.
- Run the microphone test — if you hear yourself, the problem is on the other end.
- In the Landing, voice carries eighteen cells: you may simply be far away. Close in.
- Confirm the right device is selected, and that the microphone button is not switched off.
The game feels laggy
- Watch the ping counter in the top left. Above roughly 150 ms there is noticeable input lag — try a closer world.
- A wireless connection and a busy network are the usual causes; the game itself is not heavy on the processor.
- On older graphics hardware, switch the Landing scene to classic and turn bloom off under Settings → Game and Display.
Interface sounds are silent at first
The audio path starts after your first mouse click. Press any menu item and the hover and click sounds work from then on.
14 · Legal & support
Links- Health & safety warning — read it before a long session; if a child plays, show it to them.
- Privacy Policy — what is collected and what is not.
- Data Processing Policy — retention, sub-processors, requests.
Support
Bugs, questions and balance suggestions go to our community. Patches and server maintenance are announced there as well.
10 · Party, chat and voice
Keys P · K · Enter · J · VParty
Chat and the planet journal
Voice
Microphone test
Settings → Voice has a test button: your voice takes the same path it would take to another player, but the loop closes on your own machine. That way the microphone can be checked without a second person.